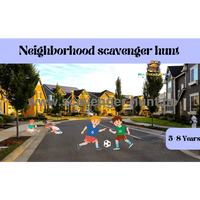
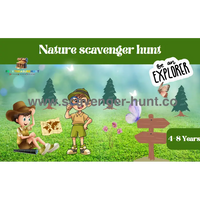
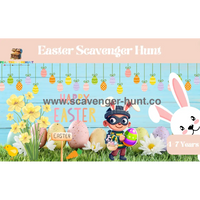
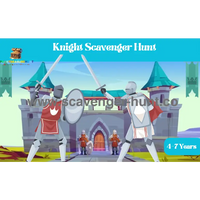
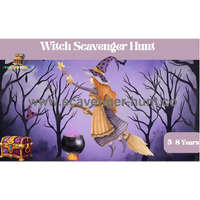
🎉🎈😍TREASURE HUNT-BIRTHDAY PARTY-SCAVENGER HUNTS-CHILDREN🎉🎈😍Scavenger Hunts 🎈💕💕

How To Make Your Own Soap Bubbles

How To Make Your Own Soap Bubbles

There's something universally captivating about soap bubbles floating through the air, their iridescent surfaces catching light and creating tiny rainbow worlds before they gently pop and disappear. While store-bought bubble solution is convenient, making your own soap bubbles at home opens up a world of experimentation, cost savings, and surprisingly superior results. Whether you're entertaining children at a backyard party, creating a relaxing atmosphere for yourself, or preparing activities for a classroom, homemade bubble solutions often outperform their commercial counterparts.

The art and science of bubble-making has fascinated humans for centuries, from ancient civilizations who discovered the mesmerizing properties of soapy water to modern researchers studying the mathematical principles behind bubble formation. Creating your own bubble solution connects you to this long tradition while giving you complete control over ingredients, strength, and bubble performance.

The Science Behind Perfect Bubbles

Understanding what makes bubbles work helps you create better solutions and troubleshoot problems when your bubbles aren't performing as expected. Soap bubbles are essentially thin films of soapy water that trap air inside a spherical shape. The soap molecules have two distinct ends: one that loves water (hydrophilic) and one that repels it (hydrophobic). This unique property allows soap to reduce water's surface tension, making it possible for the water to stretch into thin, flexible films.

The thickness of the bubble wall determines how long it will last and how it will behave. Too thin, and the bubble pops immediately. Too thick, and it won't form properly or float well. The perfect bubble solution creates walls that are just the right thickness to be stable yet flexible enough to float gracefully through the air.

Temperature and humidity also play crucial roles in bubble performance. Warm, humid conditions are ideal for long-lasting bubbles, while cold, dry air causes bubbles to pop quickly. This is why outdoor bubble play is often most successful on warm, slightly humid days or in the early morning when dew adds moisture to the air.

Essential Ingredients and Materials

Basic Ingredients for Standard Bubble Solution:

The foundation of any good bubble solution starts with three key components: water, dish soap, and a strengthening agent. Not all ingredients are created equal, and choosing the right ones makes a significant difference in your results.

For water, distilled water produces the most consistent results because it lacks the minerals and chemicals found in tap water that can interfere with bubble formation. However, tap water works fine for most purposes, especially if you let it sit out overnight to allow chlorine to evaporate.

Dish soap is the most critical ingredient, and brand matters more than you might expect. Dawn and Joy consistently produce excellent results due to their specific formulations. Avoid antibacterial soaps, as they often contain additives that interfere with bubble formation. Concentrated dish soaps work better than diluted versions.

The strengthening agent is what transforms ordinary soapy water into long-lasting, strong bubbles. Glycerin is the most common choice, available at most pharmacies and craft stores. Corn syrup works as an alternative and is often easier to find. Some bubble enthusiasts swear by adding a small amount of sugar or honey.

Specialized Tools and Equipment:

While you can blow bubbles with homemade wands from straws or wire, having the right tools enhances your bubble-making experience significantly. Commercial bubble wands come in various sizes and shapes, each creating different bubble effects. Large wands produce giant bubbles, while multi-hole wands create streams of smaller bubbles.

For mixing your solution, use clean containers that haven't held other cleaning products. Glass or plastic measuring cups work well for small batches, while larger plastic containers are perfect for party-sized quantities. A whisk or long spoon helps blend ingredients without creating too much foam.

Printable-Scavenger-Hunts-PDF

Printable-Treasure-Hunts-PDF

Classic Bubble Solution Recipes

The Basic Three-Ingredient Recipe

This tried-and-true formula works reliably for most bubble activities and serves as an excellent starting point for experimentation:

  • 1 cup distilled water
  • 2 tablespoons Dawn dish soap
  • 1 tablespoon glycerin

Mix the water and glycerin first, stirring gently to combine. Add the dish soap last, stirring slowly to minimize foam formation. Let the solution rest for at least four hours, though overnight aging produces even better results. This resting period allows the ingredients to fully combine and the solution to stabilize.

The Professional-Strength Formula

For bubbles that last longer and resist popping, try this enhanced recipe used by many professional bubble performers:

  • 6 cups distilled water
  • 1/2 cup Dawn dish soap
  • 1/2 cup corn syrup
  • 2 tablespoons glycerin

This formula creates bubbles that can last several minutes under ideal conditions and produces excellent results for giant bubble-making. The higher concentration of strengthening agents makes the bubble walls more resilient.

The Giant Bubble Recipe

Creating enormous bubbles requires a specialized formula with different proportions:

  • 6 cups warm distilled water
  • 3/4 cup Dawn dish soap
  • 3 tablespoons glycerin
  • 1 tablespoon baking powder

The warm water helps ingredients dissolve more completely, while the baking powder adds extra stability to large bubble walls. This solution works best with large loop wands or rope-and-stick bubble makers.

Advanced Bubble Solutions

The Sugar-Enhanced Formula

Adding sugar creates bubbles with extra strength and longevity:

  • 4 cups distilled water
  • 1/3 cup Dawn dish soap
  • 1/4 cup sugar
  • 2 tablespoons glycerin

Dissolve the sugar completely in warm water before adding other ingredients. This solution produces bubbles that hold their shape longer and resist breaking in light wind conditions.

The Gelatin Bubble Solution

For truly long-lasting bubbles, some bubble enthusiasts add unflavored gelatin:

  • 1 packet unflavored gelatin
  • 4 cups warm distilled water
  • 3 tablespoons Dawn dish soap
  • 2 tablespoons glycerin

Dissolve gelatin in a small amount of warm water first, then add to the remaining water. Mix in soap and glycerin gently. This solution creates incredibly strong bubbles that can last for extended periods.

Mixing Techniques and Best Practices

Proper Mixing Methods

The way you combine ingredients significantly affects your final results. Always add soap last to prevent excessive foam formation. Stir slowly and deliberately, using a figure-eight motion that thoroughly combines ingredients without creating bubbles in the solution itself.

If foam forms during mixing, let the solution sit until the foam subsides, or carefully skim it off the surface. Foam in your bubble solution prevents proper bubble formation and reduces the solution's effectiveness.

Aging Your Solution

Fresh bubble solution rarely performs as well as aged solution. The aging process allows ingredients to fully integrate and reach optimal consistency. Store your solution in a covered container at room temperature, and resist the urge to use it immediately. Solutions often improve for several days after mixing.

During aging, you may notice the solution becoming slightly thicker or developing a different consistency. This is normal and usually indicates improved performance. Gently stir aged solutions before use, but avoid creating foam.

Printable-Scavenger-Hunts-PDF

Printable-Treasure-Hunts-PDF

Troubleshooting Common Problems

When Bubbles Pop Immediately

If your bubbles pop as soon as they form, several factors could be at play. The most common cause is improper ingredient ratios, particularly too little soap or strengthening agent. Environmental conditions like low humidity or strong air currents also cause immediate popping.

Check your water quality if problems persist. Hard water with high mineral content can interfere with bubble formation. Try switching to distilled water or adding a small amount of liquid fabric softener to soften the water.

When Bubbles Won't Form at All

Solution that won't produce bubbles usually indicates either contaminated ingredients or improper mixing. Ensure all containers and tools are completely clean and free from any residue. Even small amounts of oil, food particles, or other cleaning products can prevent bubble formation.

Sometimes the dish soap brand makes the difference. If you're not getting results with your current soap, try switching to Dawn or Joy, which are consistently reliable for bubble-making.

Adjusting for Weather Conditions

Hot, dry conditions require adjustments to your standard recipe. Add extra glycerin or corn syrup to help bubbles retain moisture longer. In very humid conditions, you might need less strengthening agent to prevent bubbles from becoming too heavy to float properly.

Wind presents its own challenges. Light breezes can help bubbles float beautifully, but strong winds pop bubbles quickly. Consider the wind conditions when planning outdoor bubble activities, and have indoor backup plans ready.

Creative Bubble-Making Tools

DIY Bubble Wands

Creating your own bubble wands opens up endless possibilities for unique bubble shapes and sizes. Pipe cleaners twisted into circles, squares, or abstract shapes produce interestingly shaped bubbles that eventually round out due to surface tension.

Kitchen items make excellent bubble tools. Cookie cutters, slotted spoons, and even clean fly swatters can create multiple bubbles simultaneously. Experiment with different materials to discover what works best with your solution.

Giant Bubble Makers

For enormous bubbles, you'll need larger tools. A simple giant bubble maker consists of two wooden dowels connected by cotton rope or string. Dip the rope triangle into your solution and slowly pull it through the air to create massive bubbles.

Pool noodles with rope stretched between them work well for group activities, allowing multiple people to create giant bubbles simultaneously. Just ensure your solution container is large enough to accommodate these bigger tools.

Storage and Maintenance

Proper Storage Techniques

Store bubble solutions in clean, covered containers away from direct sunlight and extreme temperatures. Plastic containers with tight-fitting lids work well, though glass containers are ideal for long-term storage.

Label your containers with the recipe and date, especially if you're experimenting with multiple formulas. Solutions typically stay good for several weeks when stored properly, though they may need gentle stirring before use.

Extending Solution Life

To maximize your solution's lifespan, keep it covered when not in use to prevent evaporation and contamination. Store bubble tools separately, and rinse them clean after each use to prevent soap buildup that could affect future performance.

If your solution develops an unusual smell or appearance, it's time to make a fresh batch. While bubble solutions are generally stable, they can eventually spoil, especially in warm conditions.

Fun Activities and Games

Educational Bubble Experiments

Homemade bubble solutions provide excellent opportunities for learning about science concepts. Experiment with different temperatures to observe how heat affects bubble formation and longevity. Try various shapes of bubble wands to explore how surface tension always pulls bubbles into spherical shapes.

Create bubble paintings by adding food coloring to your solution and letting bubbles pop on paper. This combines art and science while demonstrating bubble properties in a visual way.

Group Activities and Parties

Bubble-making activities work wonderfully for parties and group events. Set up multiple stations with different bubble tools and solutions, allowing participants to experiment with various techniques. Consider bubble contests for longest-lasting bubble, biggest bubble, or most creative bubble tool.

For younger children, simple bubble solutions and basic wands provide plenty of entertainment. Older kids enjoy the challenge of creating giant bubbles or experimenting with bubble solution recipes.

Environmental and Safety Considerations

Eco-Friendly Ingredients

Most homemade bubble solutions use biodegradable ingredients that are environmentally safe. However, be mindful of where you use large quantities of solution, as soap can affect soil pH and plant health if used repeatedly in the same area.

Choose plant-based dish soaps when possible, and avoid solutions with synthetic additives if you're using them in garden areas or near water sources.

Safety Guidelines

While bubble solutions are generally safe, they can make surfaces slippery when spilled. Clean up spills promptly to prevent slipping hazards. Keep solutions away from young children who might be tempted to drink them, though the soapy taste usually prevents more than a small sip.

Supervise children when they're making their own solutions, especially when using ingredients like glycerin or corn syrup that could create messes or attract insects if spilled.

Seasonal Bubble-Making

Summer Bubble Activities

Hot summer days provide ideal conditions for outdoor bubble play. Early morning or evening hours often have better humidity levels for long-lasting bubbles. Set up sprinklers nearby to add moisture to the air and create rainbow effects when bubbles pass through the water spray.

Consider freezing small amounts of bubble solution in ice cube trays for a cooling twist on bubble play. The melting ice adds moisture while providing a fun sensory element.

Winter Indoor Alternatives

Cold weather doesn't have to end bubble fun. Indoor bubble activities work well with proper ventilation and protective coverings for furniture and floors. Bathroom bubble play combines well with bath time, and the humidity from hot water creates excellent bubble conditions.

For a winter science experiment, try taking bubbles outside in freezing temperatures to observe how they freeze and shatter. This requires quick work but provides memorable results.

Building on Your Bubble-Making Skills

Creating your own soap bubbles opens the door to a surprisingly deep and rewarding hobby. From simple childhood entertainment to complex artistic performances, bubble-making offers endless opportunities for creativity and experimentation. The recipes and techniques in this guide provide a solid foundation, but don't hesitate to experiment with your own variations and improvements.

Keep notes on what works best in your environment and with your preferred activities. Share successful recipes with friends and family, and encourage others to join in the bubble-making fun. Whether you're creating a moment of simple joy on a quiet afternoon or planning elaborate bubble activities for special events, homemade bubble solutions provide an affordable, customizable way to add a touch of magic to any day.

Remember that the best bubble solution is the one that works for your specific needs and conditions. Don't be afraid to adjust recipes, try new ingredients, or develop entirely new formulas. The science of bubbles is well-established, but there's always room for innovation and personal touches that make your bubble-making experience uniquely yours.

Printable-Scavenger-Hunts-PDF

0 comment
Leave a comment

Please note, comments must be approved before they are published.

This website uses cookies to ensure you get the best experience on our website.